This course has focused on using text-based interfaces to deploy calculations on an HPC resource. While tunnneling provides one way to access graphical user interfaces (GUIs), it is oftentimes slow and clusmy. Web portals provided by Jupyter and RStudio provide an alternative method that uses a web-browser to provide a more elegant development and analysis environment.
These web-based “portal tools” are deployed in many other contexts, including science gateways and cloud platforms, and help to solve the last-mile problem in academic HPC. They provide a rich interface for accessing and analyzing the large data and expensive computation provided by a traditional HPC resource.
In this section, we will start a Jupyter notebook server and access it over the web.
Jupyter
Jupyter provides interactive notebooks that allow you to develop calculations and visualizations directly inside a web browser. Many users prefer to interact with their data in this way. You can install Jupyter with any of the methods described in the Python section.
In this section we will use a pre-installed Anaconda environment to start a jupyter notebook server. There are two methods for starting a server: batch and interactive.
Jupyter notebook from a batch job
You may wish to use a large resource to serve your Jupyter notebooks, in which case we must turn to SLURM to schedule our jobs. Before we start the server, we must carefully load the right modules. For this exercise we will use anaconda and CUDA version 9.0 since we will later be using tensorflow 1.12. Matching up the Tensorflow and CUDA versions is necessary for this method to work.
$ module restore
$ module load anaconda
$ module load cuda/9.0
Next we will schedule a batch job and call a special program called jupyter_marcc. It is critical that we load the correct modules first, because they will be automatically saved and then loaded inside the batch job, before we start the notebook server. We are using debug for expedience. We could just as easily use another partition.
$ sbatch -p debug -c 6 --gres=gpu:1 -t 2:0:0 jupyter_marcc notebook
Submitted batch job 35774675
$ sqme
Use sqme to watch the job until it starts running. Once it starts, the SLURM log will be written to this folder. Use cat to look at the file. You may need to wait a few moments for the server to start. Note that your job ID will be different than the one pictured below.
$ cat slurm-35774675.out
Saved current collection of modules to: "jupyter_marcc_modules"

[STATUS] temporary screenrc at jupyter-notebook.35774675.tmp
[STATUS] executing in a screen
[STATUS] waiting for the server to start

[STATUS] Jupyter notebook server is ready!

[STATUS] Need custom modules?
         Close this notebook with ctrl+c (or scancel).
         Then, install a custom environment with:
             module load python/3.7-anaconda-2019.03
             conda create -p ./path/to/my_env_name
             conda activate ./path/to/my_env_name
             conda install pip nb_conda nb_conda_kernals
             conda install ...
             pip install ...
         then when you run this script (jupyter_notebook_start) again,
         you will always see your custom environment ('my_env_name')
         in the "New" notebook menu on jupyter.

[STATUS] additional details:
         Forwarded port: 8035
         Remote server: gpu001
         Remote port: 8035
         SSH server: login.marcc.jhu.edu
         SSH login: rbradley
         SSH port: 22
         Credential: token: c8d1f73c9ed0a95ad3bba63906d863cbc2549e1ede6a28a8

[STATUS] HOW TO ACCESS YOUR NOTEBOOK SERVER
[STATUS] from a terminal you must run:
ssh -N -L 8035:gpu001:8035 rbradley@login.marcc.jhu.edu
[STATUS] once you connect, visit:
http://localhost:8035/?token=c8d1f73c9ed0a95ad3bba63906d863cbc2549e1ede6a28a8
At this point the server is ready. Open a seperate terminal on your local machine (i.e. a laptop or desktop with a web browser) and not on the remote cluster. Use the ssh command to open another connection. Your terminal will stall if this works! Do not worry if the command does not return. This means that the tunnel is working.
$ ssh -N -L 8035:gpu001:8035 rbradley@login.marcc.jhu.edu
Leave this terminal and use the provided link above in browser. If you wish to sav time
http://localhost:8035/?token=c8d1f73c9ed0a95ad3bba63906d863cbc2549e1ede6a28a8
With your link and token (which is different than the one pictured above) you should see a notebook server. Since we previously loaded the anaconda/2019.03 module, and MARCC staff have installed several custom environments there, we have access to these inside the notebook.
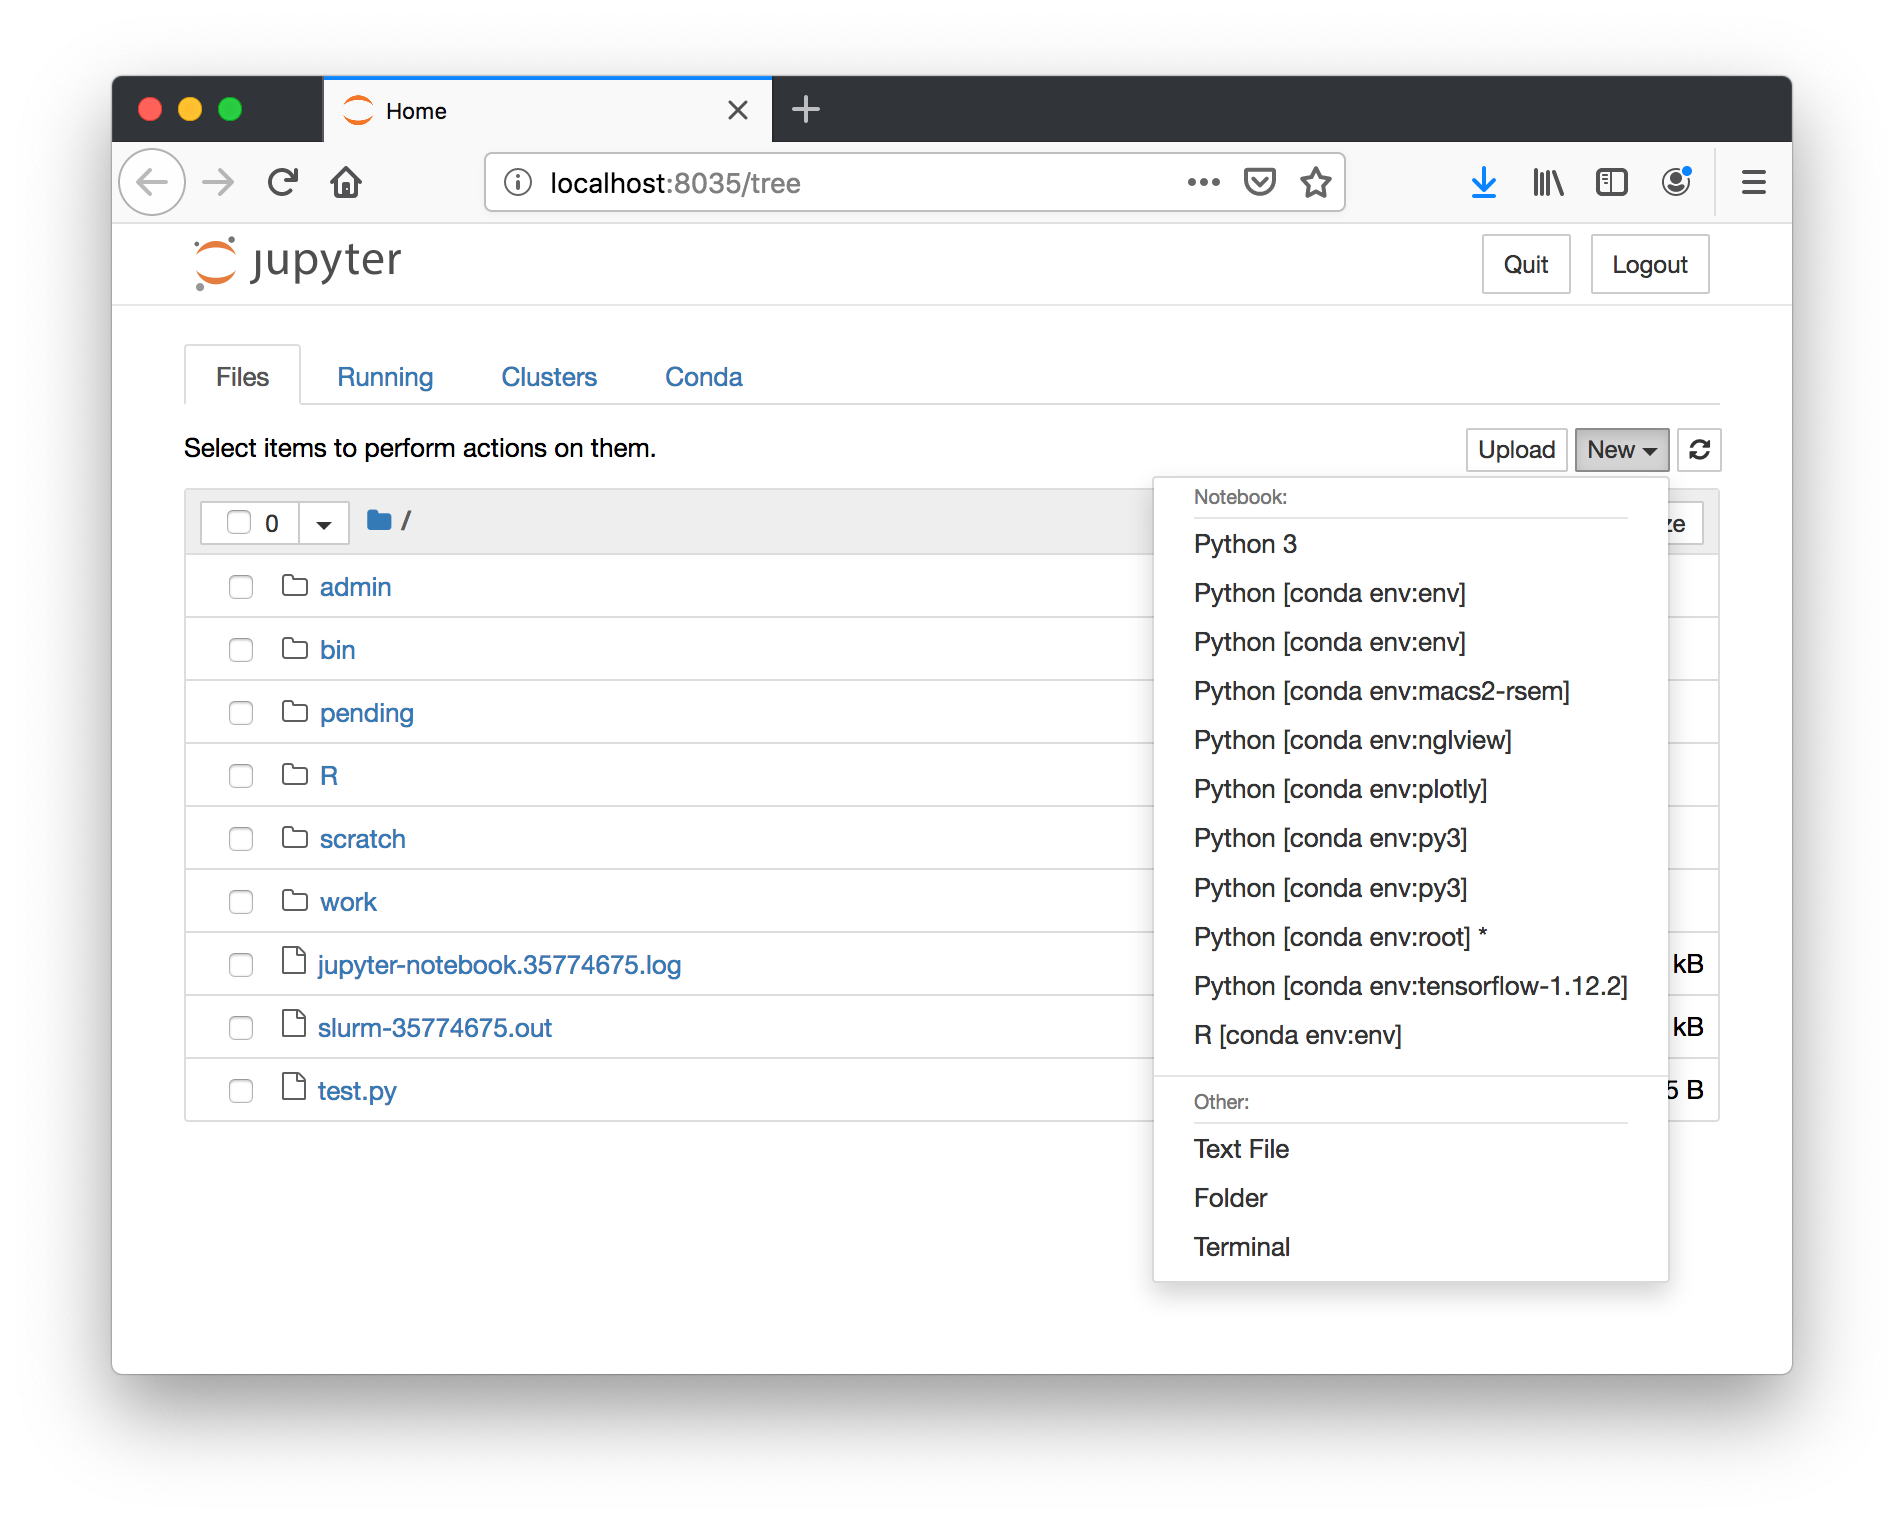
Choose the tensorflow-1.12.2 environment under the New button to make a new notebook.
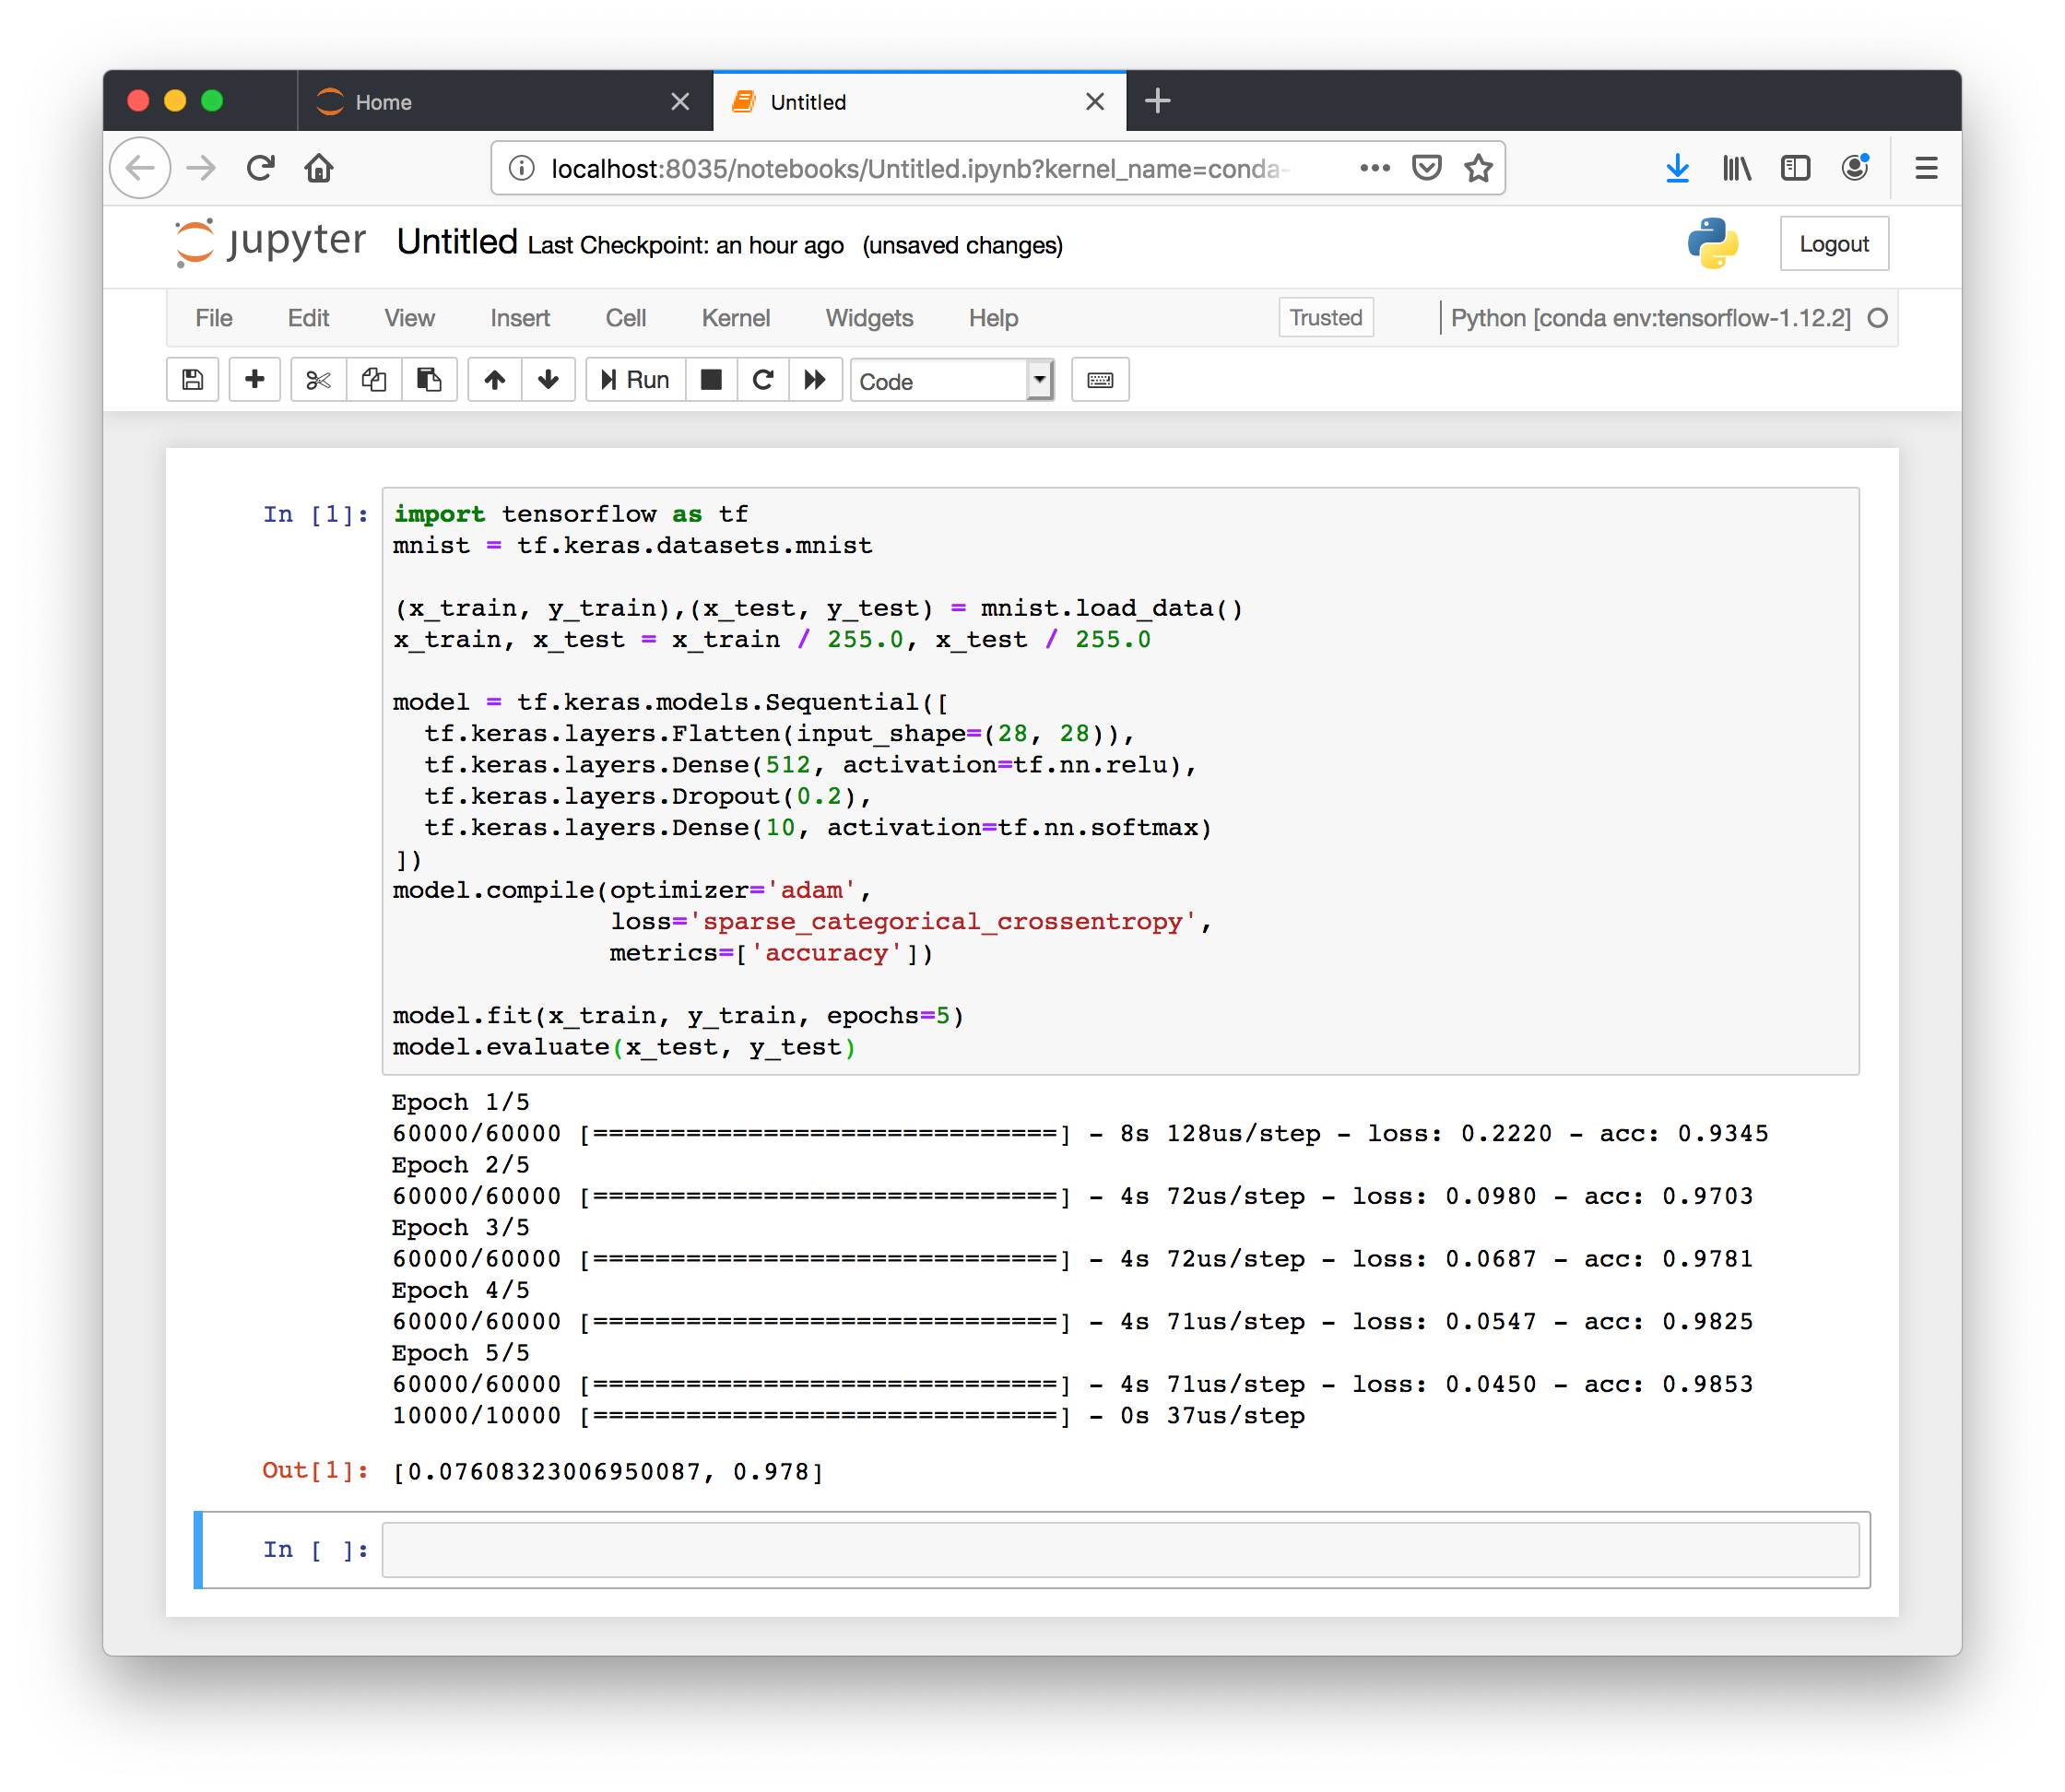
At this point we can consult the Tensorflow tutorial and perform a simple test. Add this code to a new cell.
import tensorflow as tf
mnist = tf.keras.datasets.mnist

(x_train, y_train),(x_test, y_test) = mnist.load_data()
x_train, x_test = x_train / 255.0, x_test / 255.0

model = tf.keras.models.Sequential([
  tf.keras.layers.Flatten(input_shape=(28, 28)),
  tf.keras.layers.Dense(512, activation=tf.nn.relu),
  tf.keras.layers.Dropout(0.2),
  tf.keras.layers.Dense(10, activation=tf.nn.softmax)
])
model.compile(optimizer='adam',
              loss='sparse_categorical_crossentropy',
              metrics=['accuracy'])

model.fit(x_train, y_train, epochs=5)
model.evaluate(x_test, y_test)
This example will run a short calculation on the GPU.
At this point we have demonstrated several useful concepts:
- Using the module system to load CUDA and Anaconda.
- Using a pre-built Anaconda environment supplied by MARCC staff to access Tensorflow
- Starting a Jupyter notebook server on a compute node
- Using Jupyter in a web browser to run Tensorflow on a GPU
In the remainder of this section we will discuss a few simple variations on this method which may be useful to you.
Jupyter Lab
If you prefer Jupyter Lab, you can use the following command in place of jupyter_marcc in the demonstration above.
$ jupyter_marcc lab
Piggyback a tunnel
If you have multiplexing enabled, you can also use the recommended ssh command in a separate terminal as long as you use your ssh alias, which is marcc in the example below.
$ ssh -N -L 8035:gpu001:8035 marcc
This is another way to avoid typing in your 2FA and password. These two methods make it slightly more convenient to open up a connection to your Jupter server. Multiplexing is the preferred method.
In the demonstrations above we followed the instructions explicitly and started an independent tunnel in a separate terminal. An alternative to multiplexing is to piggyback a tunnel off of our existing one. Start in a terminal on MARCC.
While holding the shift key, type ~C. You will see a ssh> prompt appear. Read the instructions from your SLURM log to get the ssh connection. Take only the -L portion and run this inside the prompt.
ssh> -L 8888:gpu001:8888
Forwarding port.
Once you do this, you can use ctrl+c to leave the ssh> prompt.
Jupyter notebook from an interactive job
You can run the jupyter_marcc program from an interactive SLURM job as well. You can use ctrl+c</kdb> to regain a terminal.
$ interact -p debug -c 6 -g 1 -t 2:0:0
Tasks:    1
Cores/task: 6
Total cores: 6
Walltime: 2:0:0
Reservation:
Queue:    debug
Command submitted: salloc -J interact -N 1-1 -n 1 -c 6 --time=2:0:0 --gres=gpu:1 -p debug srun --pty bash
salloc: Pending job allocation 35774883
salloc: job 35774883 queued and waiting for resources
salloc: job 35774883 has been allocated resources
salloc: Granted job allocation 35774883
$ ml anaconda/2019.03 cuda/9.0
$ jupyter_marcc lab
Saved current collection of modules to: "jupyter_marcc_modules"

[STATUS] temporary screenrc at jupyter-notebook.35774883.tmp
[STATUS] executing in a screen
[STATUS] waiting for the server to start

[STATUS] Jupyter notebook server is ready!

[STATUS] Need custom modules?
         Close this notebook with ctrl+c (or scancel).
         Then, install a custom environment with:
             module load python/3.7-anaconda-2019.03
             conda create -p ./path/to/my_env_name
             conda activate ./path/to/my_env_name
             conda install pip nb_conda nb_conda_kernals
             conda install ...
             pip install ...
         then when you run this script (jupyter_notebook_start) again,
         you will always see your custom environment ('my_env_name')
         in the "New" notebook menu on jupyter.

[STATUS] additional details:
         Forwarded port: 9653
         Remote server: gpu001
         Remote port: 9653
         SSH server: login.marcc.jhu.edu
         SSH login: rbradley
         SSH port: 22
         Credential: token: b87a54711478a9205daba89eb9f55ed4bc7aaf235d805237

[STATUS] HOW TO ACCESS YOUR NOTEBOOK SERVER
[STATUS] from a terminal you must run:
ssh -N -L 9653:gpu001:9653 rbradley@login.marcc.jhu.edu
[STATUS] once you connect, visit:
http://localhost:9653/?token=b87a54711478a9205daba89eb9f55ed4bc7aaf235d805237

# use ctrl+c to regain the terminal, then use ~C to get an ssh prompt

ssh> -L 9653:gpu001:9653
Forwarding port.
After the procedure above, the localhost link should take you to your server.
When using this method, it is important to note that you can only start one server per interactive session for technical reasons. If the procedure fails for any reason, you must start a new job. Using this method in combination with the piggyback method described above offers another way to quickly access a notebook.
Custom environments
If you wish to use a custom Anaconda environment inside of a Jupyter notebook, your Anaconda environment must contain three critical packages: jupyter, pip, nb_conda, and nb_conda_kernals. These packages convey the environment to the Jupyter notebook server.
Here is an example requirements.yaml file for building such an environment. Please see our guide to custom environments for more details.
channels:
  - pytorch
  - conda-forge
  - defaults
dependencies:
  - nodejs
  - matplotlib
  - nb_conda
  - nb_conda_kernels
  - pip
  - jupyter
  - jupyter_client
  - jupyter_console
  - jupyter_core
  - jupyterlab
  - jupyterlab_server
  - pip:
    - nglview==1.1.9
    - mdanalysis
We recommend using a very explicit name for your environment, so you can distinguish it from others when you arrive in your Jupyter notebook.
In addition to jupyter_marcc there is also an RStudio program that serves a similar function documented here. In this case, you must replace the jupyter_marcc program with rstudio_server_start to access RStudio server, otherwise the procedure is the same.
The jupyter_marcc command above allows you to use any custom Anaconda environments inside of a web-based Jupyter notebook which has access to all of the computational power provided by Blue Crab.